
Your home’s exterior plays a significant role in creating a lasting first impression. The front façade, especially if it’s brick, is the centerpiece of your house’s curb appeal. Over time, however, bricks can become outdated, damaged, or not suit your style. Whether you want to enhance your home’s look, address structural concerns, or improve energy efficiency, many ways exist to replace or cover brick effectively.
Understanding the Need to Replace or Cover Brick on the Front of a House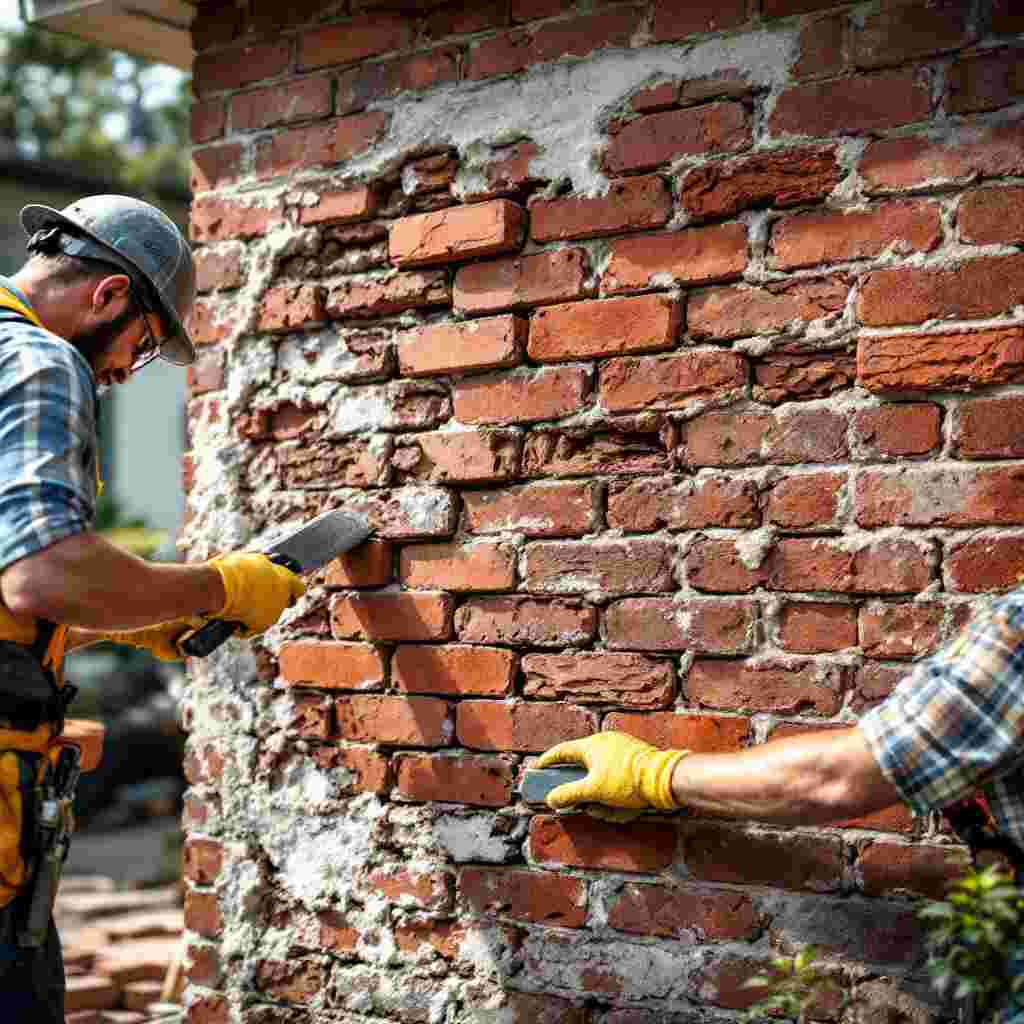
Why Replace or Cover Brick?
Brick is known for its durability, but it isn’t indestructible. Over time, it can face several challenges, such as:
- Damage: Cracks, crumbling mortar, or missing bricks can compromise the structural integrity.
- Aesthetics: Brick styles can go out of fashion, leaving your home looking dated.
- Energy Efficiency: Old brick walls may not provide the insulation needed for modern homes.
Replacing or covering the brick can address these issues, breathe new life into your home’s exterior, and boost its market value.
Signs Your Brick Façade Needs Attention
- Cracks or Crumbling: Noticeable cracks across the brick or mortar joints can indicate structural issues.
- Moisture Problems: Stains, mold, or efflorescence (white powdery residue) signal water damage.
- Loose or Missing Bricks: These are often signs of wear and tear requiring immediate action.
- Drafts or Poor Insulation: If your brick wall lets in drafts, it could be time to replace or cover it with better-insulated materials.
The Impact of Neglected Brickwork
Ignoring damaged bricks can lead to the following:
- Decreased property value
- Higher energy bills due to poor insulation
- Safety risks from structural instability
Addressing these issues promptly ensures your home remains safe, visually appealing, and energy-efficient.
Assessing Your Options: Replace, Repair, or Cover?
When faced with deteriorating brickwork, you must decide whether to replace, repair, or cover the brick. Each option has its advantages and drawbacks.
Full Replacement
Pros:
- Completely renews your home’s appearance.
- Fixes structural issues from the ground up.
- Long-lasting solution.
Cons:
- Expensive and labor-intensive.
- Requires significant time and professional expertise.
When to Choose Replacement:
- If the damage is widespread, such as severe cracks or collapsing sections.
- When the current brick cannot be salvaged.
Repairing the Brick
Pros:
- Cost-effective compared to full replacement.
- Quick solution for minor cracks or loose bricks.
Cons:
- Limited to small-scale fixes.
- It may not address underlying structural or aesthetic concerns.
When to Choose Repair:
- If the damage is minimal or purely cosmetic.
- When you want to preserve the original brickwork.
Covering the Brick
Pros:
- It offers endless design possibilities (Siding, stone veneer, stucco).
- It can improve insulation and weatherproofing.
- Easier and faster than a full replacement.
Cons:
- It may not address severe structural issues underneath.
- Requires careful installation to avoid moisture problems.
When to Choose Covering:
- If the brick is structurally sound but outdated or unattractive.
- When you want a modernized look without the cost of replacement.
Cost and Time Comparisons
OptionCost Range (per sq. ft.)Time to CompleteDisruption Level
Full Replacement $15 – $30 2-4 weeks High
Repair $5 – $10 1-2 days Low
Covering (e.g., siding, stucco) $10 – $20 1-2 weeks Moderate
How to Replace Brick on the Front of a House: Step-by-Step Guide
Replacing brick is a detailed process that requires preparation, precision, and the right tools. Follow these steps to ensure a successful project.
Preparation and Safety
Before diving into the work, ensure safety and preparation come first.
- Safety Gear: Wear gloves, goggles, and a dust mask to protect yourself from debris and dust.
- Tools and Materials:
- Chisel
- Hammer
- Pry bar
- Replacement bricks
- Mortar mix
- Trowel
- Level
Removing the Old Brickwork
- Start at the top of the wall and work downward to avoid collapse.
- Use a hammer and chisel to remove each brick, carefully loosening the mortar.
- Remove debris and clean the exposed surface thoroughly to prepare for the new installation.
Preparing the Wall for New Brick or Veneer
- Sand and clean the surface to remove dust or old mortar.
- Roll out a waterproof lath and secure it with nails.
- Apply a scratch coat of mortar and let it cure for 24 hours.
Installing New Brick or Brick Veneer
- Mix mortar according to manufacturer instructions. For a seamless look, match the mortar color to your existing brick.
- Starting from the bottom, apply mortar to the wall and back of the bricks.
- Lay the bricks row by row, using a level to ensure alignment.
- Cut bricks as needed to fit corners and edges.
- Fill joints with mortar and smooth them with a jointing tool.
Curing and Final Touches
- Allow the mortar to cure for at least 48 hours.
- Clean off excess mortar with a soft brush or damp cloth.
- Inspect the wall for gaps or weak points and fix them as needed.
Special Considerations
- Matching Brick: Choose bricks that complement your home’s original design.
- Corners and Edges: Take extra care around windows and doors to prevent gaps or misalignment.
- Weatherproofing: Ensure proper drainage and waterproofing to protect the wall from future damage.
Alternative Ways to Cover Brick on the Front of a House
If replacing the brick feels too daunting or expensive, covering it is an excellent option. Here are some popular covering methods.
Painting or Whitewashing
- Pros: Affordable, quick, and easy to personalize.
- Cons: Requires regular maintenance to prevent peeling or fading.
- Process:
- Clean the brick thoroughly.
- Apply a primer designed for masonry.
- Paint with exterior-grade paint or whitewash for a rustic look.
Installing Siding
- Types of Siding: Vinyl, fiber cement, or wood.
- Pros: Durable, low maintenance, and available in various styles.
- Cons: Can trap moisture if not installed correctly.
Stucco or Render Finishes
- Pros: Adds texture and a modern look.
- Cons: Requires professional installation.
- Process:
- Apply a base coat of stucco.
- Add layers to achieve the desired thickness and texture.
Stone Veneer or Cladding
- Pros: Offers a luxurious and natural appearance.
- Cons: Higher cost compared to other options.
- Process:
- Attach a lath to the brick.
- Apply a mortar base and adhere to the stone veneer.
Creative Coverings
- Add wood panels or decorative tiles for a unique design.
- Combine materials like stone and Siding for a mixed-media look.
Expert Tips for a Successful Brick Replacement or Covering Project
- DIY vs. Professional Help: Only take on small repairs as DIY. For large-scale projects, hire licensed contractors.
- Avoid Common Mistakes: Improper mortar mixing, poor alignment, and ignoring drainage can lead to issues.
- Maintenance: Regularly inspect and clean your new façade to prolong its life.
Cost Breakdown and Budgeting
Factors Affecting Costs
- Size: Larger areas cost more to replace or cover.
- Materials: High-end materials like stone veneer are pricier.
- Labor: Professional installation increases costs but ensures quality.
Tips to Save Money
- Opt for partial replacements or repairs.
- Choose cost-effective materials like vinyl siding.
You may also read (flickering in my house)