
Your bathroom floor plays a huge role in both the functionality and style of your space. Whether it’s outdated tiles, water damage, or simply a desire for a new look, replacing your bathroom floor can significantly enhance your home’s aesthetic and value. But how do you tackle this project efficiently?
Why Replacing Your Bathroom Floor Matters
Enhancing Style and Functionality
Your bathroom floor is one of the most noticeable elements of the space. Worn-out or outdated flooring can make the entire room feel drab. By replacing it, you can introduce clean lines, modern designs, and a fresh look that complements your overall home aesthetic.
Increasing Home Value
Did you know that bathrooms are among the top areas that buyers evaluate when purchasing a home? A newly installed bathroom floor can boost your property’s resale value by creating a polished, modern appearance.
Improving Safety and Hygiene
Old flooring can harbor bacteria, mold, and mildew, especially if it’s damaged or improperly sealed. Replacing your bathroom floor allows you to upgrade to water-resistant materials that are easier to clean and safer for your family.
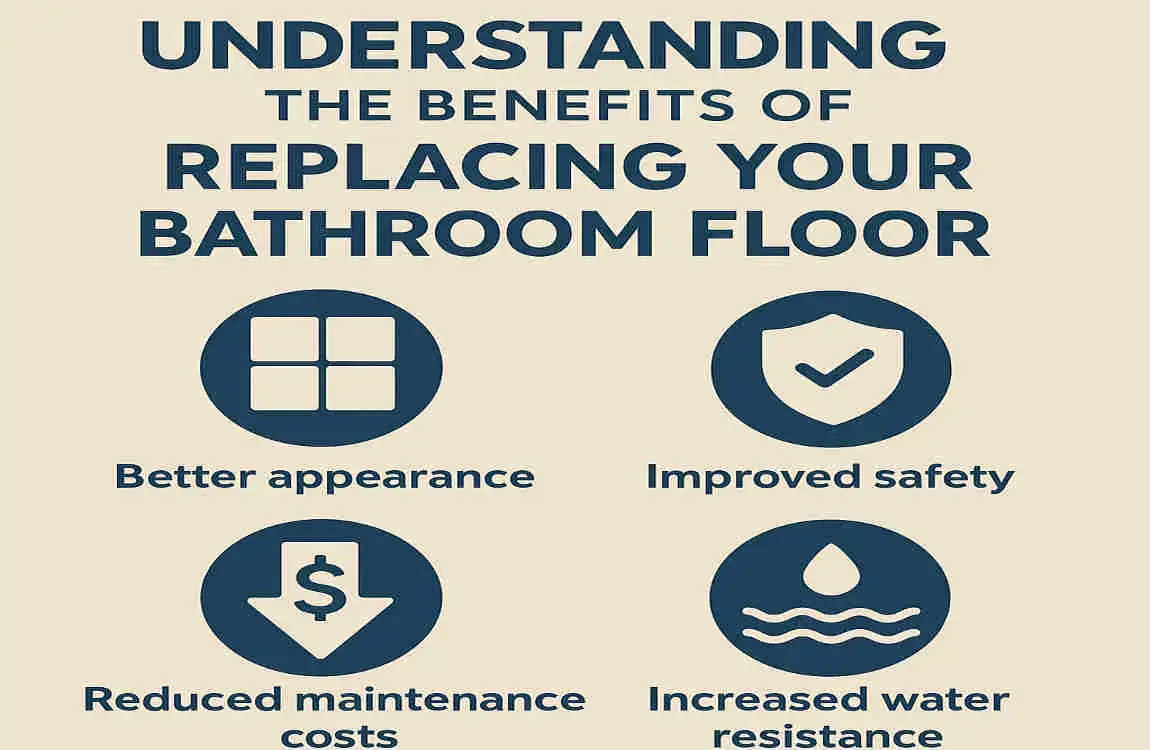
Benefits of Replacing Your Bathroom Floor
Here’s a closer look at why updating your bathroom floor is such a worthwhile project:
- Improved Durability: Modern materials like luxury vinyl plank (LVP) or porcelain tiles are designed to withstand moisture and heavy use, making them perfect for bathrooms.
- Better Hygiene: New flooring eliminates hidden dirt, mold, and bacteria trapped in old materials.
- Enhanced Comfort: Upgrading to materials with better insulation can make your bathroom floor warmer and more comfortable to walk on.
- Added Value: Remodeling Magazine reports that bathroom updates, including flooring, can deliver a strong return on investment.
Replacing your bathroom floor isn’t just a functional update—it’s an opportunity to elevate your home’s style, comfort, and value.
Planning Your Bathroom Floor Replacement
Before diving into the project, careful planning is essential. Here’s how to get started:
Assess Your Current Bathroom Floor
Take a good look at your existing floor. Is it cracked, stained, or outdated? Identifying the problems with your current flooring will help determine the materials and tools you need.
Measure Your Bathroom Floor
Accurate measurements are critical for estimating costs and ensuring you buy the right amount of materials. Use a tape measure to measure the length and width of your bathroom, then multiply them to find the square footage.
Set a Budget for the Project
Decide how much you’re willing to invest in the project. Factor in the cost of materials, tools, and potential professional labor if you’re not doing it yourself. Setting a realistic budget helps avoid unexpected expenses.
Choose the Right Time
Bathroom floors need time to dry and cure after installation. Plan the project during a time when the bathroom won’t see heavy use (for example, when guests aren’t visiting).
Choosing the Best Flooring Material for Bathrooms
When it comes to bathrooms, not all flooring materials are created equal. Let’s explore some popular options:
Tile Flooring
- Ceramic and Porcelain Tiles: Both are highly durable, waterproof, and available in a wide range of designs. Porcelain is denser and slightly more water-resistant than ceramic, making it ideal for high-moisture areas.
- Natural Stone Tiles: Elegant and luxurious, natural stone like marble or slate adds sophistication but requires sealing to prevent water damage.
Vinyl Flooring
- Luxury Vinyl Plank (LVP): Waterproof, easy to install, and budget-friendly, LVP mimics the look of hardwood or stone without the high cost.
- Sheet Vinyl: A cost-effective option that’s also moisture-resistant and simple to maintain.
Engineered Wood and Laminate
While traditional hardwood isn’t suitable for bathrooms due to moisture, engineered wood and laminate offer a similar appearance with better water resistance. However, these materials still require proper sealing.
Unconventional Options
Some homeowners opt for waterproof carpeting or concrete floors for a unique look. These materials can work well if properly installed and maintained.
Material Pros Cons
Ceramic/Porcelain Tile: Durable, waterproof, stylish. Cold to the touch, it requires grout maintenance.
Luxury Vinyl Plank: Budget-friendly, waterproof, easy to install. It may not add as much value as tile.
Engineered Wood Warm, natural look. Requires sealing, less water-resistant.
Tools and Materials Needed for Replacing Bathroom Floors
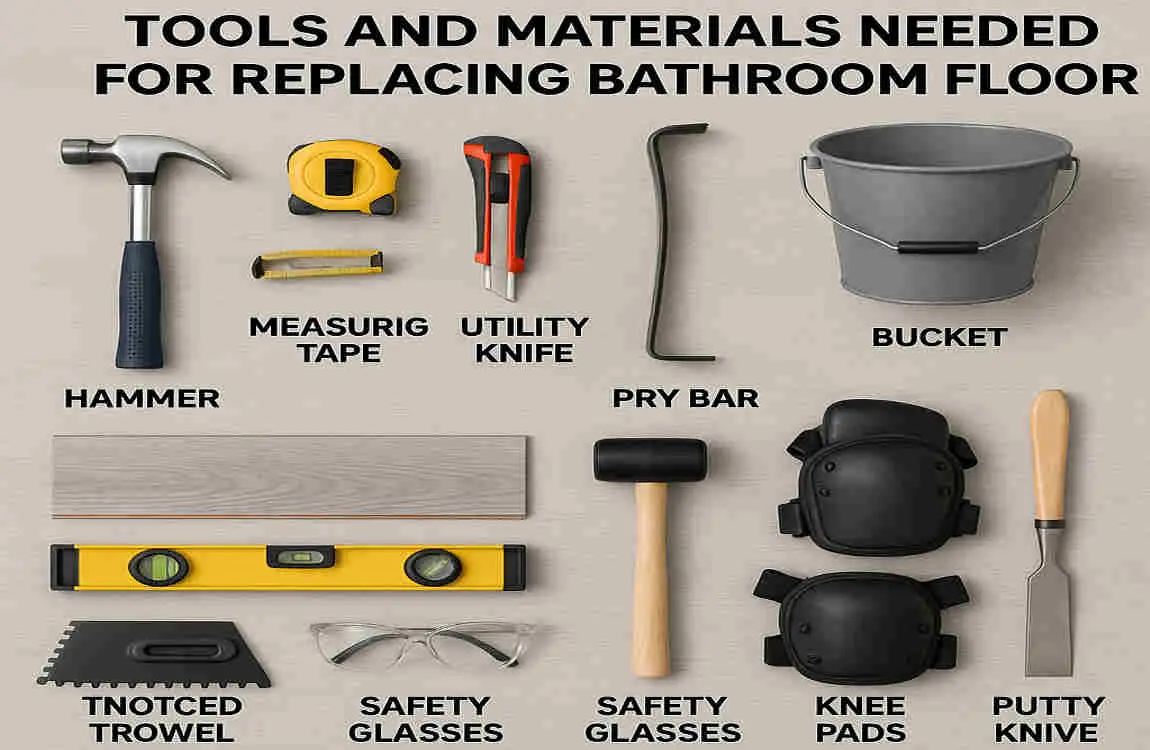
Before starting the project, gather these essentials:
Tools:
- Crowbar or pry bar
- Tape measure
- Utility knife
- Tile cutter or saw
- Trowel
- Grout float
Materials:
- New flooring (tiles, planks, or vinyl)
- Underlayment or moisture barrier
- Adhesive or mortar
- Grout (for tiles)
- Sealant
Safety Gear:
- Gloves
- Goggles
- Knee pads
Pro Tip: Purchase high-quality tools and materials to ensure a durable, professional finish.
Step-by-Step Guide to Removing Old Bathroom Floor
Removing the old bathroom floor is a critical first step. Follow these steps:
Preparation
Clear out everything from the bathroom, including rugs, fixtures, and furniture. Use plastic sheets to protect nearby fixtures.
Turn Off the Water Supply
Shut off the water supply to prevent leaks while working.
Remove Baseboards
Carefully pry off baseboards using a crowbar. This allows you to remove flooring up to the edges.
Remove Old Flooring
Depending on the material, use a utility knife, scraper, or hammer to remove the existing floor. Be cautious not to damage the subfloor.
Inspect and Repair the Subfloor
Check for water damage or rot in the subfloor. Repair any weak areas before installing the new flooring.
Installing Your New Bathroom Floor: Step-by-Step
Now comes the fun part—installing your new floor! Let’s break it down:
Lay the Underlayment
If required, install a moisture barrier or underlayment to protect your floor from water damage.
Measure and Cut Flooring
Cut your new tiles, planks, or sheets to fit the bathroom layout. Precision is key for a clean look.
install the Flooring
- For tiles: Apply adhesive, place tiles, and use spacers for even grout lines.
- For vinyl: Lay the sheets or planks, securing them with adhesive as needed.
Grout and Seal
If you’re using tiles, apply grout between tiles and seal the surface to prevent water infiltration.
Allow Drying Time
Let the floor cure for the recommended time before walking on it or reattaching fixtures.
Finishing Touches for Style and Value
Once your floor is installed, enhance your bathroom with these finishing touches:
- Add coordinating rugs and mats to protect the floor and add comfort.
- Update fixtures, such as faucets and towel racks, to match the new flooring style.
- Incorporate decorative elements, such as wall art or plants, to add personality.
Common Mistakes to Avoid
Avoid these pitfalls for a smoother installation process:
- Skipping accurate measurements
- Using the wrong adhesive or grout
- Ignoring moisture barriers
- Overlooking subfloor damage
- Rushing the drying process
When to Hire a Professional
While replacing a bathroom floor can be a DIY project, you may want to hire a professional if:
- The subfloor requires extensive repairs.
- You’re using complex materials, such as natural stone.
- Precision cuts are essential for intricate layouts.